Wednesday, December 31, 2008

Birthday Card


Here is another card for today's Card Sketch Challenge. Here's how I put this one together.
Base Card is Basic Black
the next three (3) layers are My Momenta Textured CS all layered on Basic Black.
Added Ribbon and Brads. Stamped sentiment from Warmest Regards in VersaMark and then embossed in black. Cut with nestibilities.
The little bird image is from Inkadinkado and stamped on Water Color Paper.
Colored with Prisma Colors and Odorless Mineral Spirits. Masked and sponged with Bordering Blue and Black. This is also layered on Basic Black.
Added decorative borders along the top and bottom.
Added Prima Flowers with brad center over leaves punched out with MS Leaf Punch in Certainly Celery...
Thanks so much for looking....
Happy 2009!!!!!!!!!!!!
Fern
Pin It!

Valentines Card


Here is a card I made for today's Card Sketch Challenge. This may be the last card I make for the year, and then, I might have enough time to get one more in... We'll see.. Here is how I made this card.
Base Card is Basic Black
Layered a piece of Doodlebug Crushed Velvet on the front.
All other layers are K&Company DP layered on Crushed Velvet CS. I used a decorative punch on the corners.
Hearts are cut with QuicKutz Heart Folder and layered.
The sentiment is stamped from A Happy Heart Set with VersaMark and then embossed in Black.
Added Sugar Coated Black Brads and Doodlebug Brads.
Thanks for looking... And I hope everyone has a safe and happy NEW YEAR!!!

HAPPY BIRTHDAY TO MY DH!!! 52 AND STILL SWEET AS EVER...(anyway most of the time...)lol
Fern
Pin It!

Tuesday, December 30, 2008

Happy Birthday Card..


Here is the card I made for today's Color Combination Challenge. We were to use So Saffron, Bravo Burgandy and Handsome Hunter. This actually went together pretty fast. Which is good, because I didn't get home until after 8:00 PM.. Really late for me... But I'm off tomorrow.... Wooo-Hooo........ Here is what I did:
Base Card is Bravo Burgandy,
Next is a layer of K&Company DP.
Added strip of Bravo Burgandy along the top that was punched with the MS Border Punch.
Image is from Brocade Basics and stamped in Handsome Hunter on So Saffron. Colored over with the SU Handsome Hunter Marker. Sponged around the edges with Bravo Burgandy and then layered on Handsome Hunter.
Sentiment is from On Your Birthday and is stamped in Basic Black on K&Company Dp and then punched out with the SU Oval PUnch, and then layered on Bravo Burgandy. This is popped up on pop dot over ribbon. Added Bow and silk flowers.
Thanks so much for looking...
Fern
Pin It!

Monday, December 29, 2008

Fun Funky Fold Thank You Card - Closed


This is the card I made for today's Try a New Technique challenge. We were to make this fun funky fold card, using the basic pattern of the Squash Book, but instead of a book we made a card.
You take an 8" by 8" piece of cardstock or dp. I used K&Company DP. Score at 4 inches on each side. And then score from one corner across the center to the other. Fold on the score lines. You may have to experiment with this, but you will get it.. I did, so I know you can do it... When you have it folded into a square, I folded the front page down. I cut two pieces of cs out with the nestibilities, one in Sage Shadow and one in Barely Banana. Stamped sentiment from All Holidays with Sage Shadow and then again off set in Cameo Coral on the Barely Banana layer. Added ribbon, SU Pretties stick pin and faux pearl beads and a sticker flower. For the sentiment on the inside I used Hero Arts Spiral Thank You in Cameo Coral on Barely Banana and then layered on Sage Shadow. Cut the corners with All Night Media decorative punch. Added Heart Jewel. This was a lot of fun...
Thanks for looking..
Fern
Pin It!

Funky Fold Thank You - Open


Here it is open..
Pin It!

Saturday, December 27, 2008

MacKenzie-Childs Thank You Card


I hope everyone had a verry Merry Christmas, I know we did. It was so nice to spend time with family and friends. And the little ones are soo cute to watch opening their gifts.
Here is a card I made for today's Inspiration Challenge. We were to get inspired with pieces from MacKenzie-Childs website. They have so many gorgeous pieces, and it was just a teeny bit hard to decide what to go with, but I finally decided on the Red Harlequin Wing Back Chair, seen in this picture.... I need some Thank You cards and I thought this would be an awesome background for a Thank You card. Here is what I did.
The Base card is Creamy Caramel.
Next is a layer of Doodlebug Crushed Velvet DP.
The top of the next layer is 7 gypsies Savannah Flocked Harlequin DP.
The bottom is 7 gypsies Savannah Flocked Stripe DP.
Added ribbon where the two layers meet.
Added Making Memories Antique Copper Brads on both ends of the ribbon.
Punched the corners out of Doodlebug Crushed Velvet with CB Vintage Corner Dies and attached to the corners of the card. Added 2 black brads in each corner.
Stamped the sentiment from Thank You Kindly with VersaMark on Creamy Caramel and then embossed in Burgandy EP.
Cut with nestibilities and sponged Bravo Burgandy around the edges.
Layered on Doodlebug Crushed Velvet cut with scallop nestibilities.
The bird is actually from 7 gypsies Savannah Flocked Bird DP which I cut out and then layered on a piece of Doodlebug Crushed Velvet DP and then cut out again. This is popped up on pop dots.
Thanks for taking a peek at my blog...
Fern
Pin It!

Thursday, December 25, 2008

Cute As A Button..


Here is another card I made for today's SCS Ways To Use It Challenge, which was to use Creative Letters.. Since the kids are at their in-laws for Christmas today, I have plenty of time to stamp. All of them will be here tomorrow to celebrate Christmas. I can't wait to see the little ones... and the big ones, too....lol.. Anyway I won't have time to stamp tomorrow, so I made another card today...
This is what I did...
Base card is Barely Banana,
Next is a layer of Sage Shadow - which I ran through the CB Swiss Dots EF.
Added Chipboard corners
Stamped sentiment "cute" from So Very in Regal Rose ink on Whisper White CS. Cut out and attached to flower chipboard.
Letters are from Bo Bunny Press.
Tied ribbon in button and attached.
Added bow with little button on the bottom.
Thanks so much for looking...
Fern
Pin It!

Cheers! Happy New Year.........


This is a card I made for today's SCS Ways to Use It Challenge. I know it's Christmas, but the kiddos are at the "other" side today, and our "BIG" day is tomorrow... So it's just me and hubby today, and he's working on a tractor so I made this fun New Years Card.
I cut 2 images of the Champagne Card out, with the Cricut Wildcard cartridge on size 7.5 One in Black and one using Flowers - Silver Glitter DP. Cut the Champagne Bottle off of the silver glitter paper and attached to Doodlebug Crushed Velvet. Layered this over the front of the card. Used chipboard on the letter "C" and attached the glitter paper to this also. The rest of the letters are Spare Parts Metal Letters. The bottle stopper and neck of the bottle are embossed with Gold EP. Stopper is popped up on pop dots.
The Sentiment is stamped on black cs with VersaMark and embossed in Silver. Punched out the SU Circle Punch. Clear embossed the whole circle, to make the black cs shiny. This is layered over a piece of the Silver Glitter DP. Popped up.
Cut Silver headed Boutonniere Pins off and added around the sentiment.
Added Mark Richards Metals along the bottom, and a ribbon to the Champagne Bottle.
Thanks so much for looking..
Fern
Pin It!

Wednesday, December 24, 2008

Faux Silk Merry Christmas


I want to wish everyone a very Merry Christmas and a very safe one...
This is my last Christmas Card for this year. I made this one for my DH.. I will just put it under the tree with some cash in it.. That's the safest thing for me to give him, so he can go get whatever tractor part he wants to... I'm clueless when it comes to that sort of thing... Anyway, this is what I did...
Base Card is Basic Black
Next is a layer of Doodlebug Crushed Velvet.
Next is a layer of Sparkle Adhesive Red.
Next is s e i DP Alpin Frost Winterberry.
The top layer with sentiment is the Faux Silk Technique with green tissue paper, stamped with Hero Arts - Large Merry Christmas in Basic Black ink, and then sponged all over with Basic Black.
This is layered on Whisper White and then layered on Sparkle Adhesive Red.
This is staggered over the Crushed Velvet.
I added the brads.
Thanks for looking...
Fern
Pin It!

Tuesday, December 23, 2008

Spring Birthday Card.


Here is the card I made for today's Color Combination Challenge. We were to use Orchid Opulence, So Saffron and Cameo Coral. I was a little hesitant at first, but actually had fun with it. Needed to get away from Christmas colors and this was perfect...
Here is what I did.
Base card is So Saffron, Stamped with Floral BG with So Saffron ink.
Cut a strip off of the bottom. Added a strip of Orchid Opulence that I stamped with Twill BG with Orchid Opulence ink and punched the edge with SU scallop punch.
Punched a piece of Whisper WHite with the MS Scallop Border Punch. Layered this layer over the top of the Orchid Opulence strip. Added buttons.
The flowers are from Big Flowers and Baroque Motifs. Stamped on Orchid Opulence and Cameo Coral. Cut the flowers out and added a button for the center.
Used SU corner punch in Orchid Opulence and Cameo Coral, layered and added SU Pretties.
Butterfly is from Flight of The Butterfly, stamped on Cameo Coral, and on Whisper White with Camoe Coral. Cut and layered. Added SU Pretties for the body.
This card just makes me feel happy.. I think it will be perfect for a Birthday Card.
Thanks so much for looking.
Fern
Pin It!

Monday, December 22, 2008

Faux Silk Morning Glory


This is the card I made for today's Try a New Technique Challenge. Faux Silk with a POP. I really like the faux silk look, but I didn't get the pop I wanted so I did some extra coloring and sponging. Here is what I did.
Base card Elegant Eggplant.
Next layer is Whisper White.
Next is a layer of DCWV from Old World Stack.
My image layer:
Stamped Morning Soft morning glory on a piece of tissue paper. Let dry.
Next, crumple and roll in a ball.
Carefully unroll image.
Stamp the same image on Whisper White CS. Cut out the portion you want to pop.
Take a glue stick and cover piece of light or white cs, put your cut portion of the image on this and then layer the tissue paper over the top of that. Line it up exactly. Keep the wrinkles in, that's the faux silk look.
I did all of that, but I colored the bottom image hoping it would show through the tissue paper more than it did. So, I colored the tissue paper image with SU Markers. Then I sponged around the edges with Elegant Eggplant.
Layered this on Whisper White, and then on Elegant Eggplant.
Added jewels, bow and faux pearls.
I really like the look of this... And will be using this technique again and again.. I think it made this card look very Victorian..
Anyway, thanks for looking..
Fern
Pin It!

Sunday, December 21, 2008

My Precious Grandbabies...


My sweet little Savannah at 3 1/2 years and precious Colten at 1 month..
Pin It!

Christmas Thank You Card...


Here is another Thank You Card for Christmas. I will be taking this to work with me tomorrow.
Here's what I did..
Base card is Real Red
Next layer is DSWR Solid Glitter Green
Top layer is Doodlebug Holly Days CS. Used decorative corner punch on the corners of this layer, don't know if you can see this, or not.
Sentiment is from Cheery Chat and is stamped with VersaMark on Whisper White and then embossed with Red Glitter. Cut out with Nestibilities, and layered on a piece of DSWR Solid Glitter Green, also cut with Nestibilities, over a red ribbon. Punch leaves with MS Leaf Punch in Real Red and Glitter Green and then I added Holiday Time Sequin Bows over them. Added red jewels.
I really like the way this card came out... It's just cheery...
Thanks so much for looking.
Fern
Pin It!

Christmas Thank You Card


I made this card for my DMIL who lives in OK and actually her favorite colors are red and black..
The base card is Basic Black
Next layer is Doodlebug Crushed Velvet
Next layer is Anna Griffin DP
Sentiment is from Thank You Kindly and is stamped with VersaMark on Real Red and then embossed in Black. Cut out with nestibilities. Layered over Doodlebug Crushed Velvet cut out with nestibilities.
Punch the corners out with SU Corner Punch - Crushed Velvet.
Added the ribbon and the jewels..
Very easy but elegant Thank You Card....
Thanks so much for taking a peek.
Fern
Pin It!

Last Minute Fridge Magnet Calendar


This is the gift I made for Thursday's Ways to Use It Challenge, which was to make a quick gift. I think is took longer just to try to get a good picture of it, than it was to make it..lol..
The bottom layer is Bordering Blue, which I stamped Twill BG Stamp with Bordering Blue. Cut with Nestibilities.
Next layer is Ta Da - Paisley Papa, this is double sided DP and the other side is paisley, but this side looks more like a basketweave to me.. Go figure...Anyway I cut this layer out with nestibilities, too. Added the ribbon and then layered the layers. Added the buttons with cord centers.. The calendar is from Vippies and I attached that. Punched leaves out with MS Leaf Punch in Bordering Blue and Creamy Caramel and then layered the silk flowers over them. Then center of the flower is Bordering Blue stamped with the Fresh Cuts "for you" in VersaMark and then embossed in brown, cut out with nestibilities and popped up with pop dot... Added a business card magnet to the back, from Office Depot, and it's ready to go...
Thanks so much for looking...
Fern
Pin It!

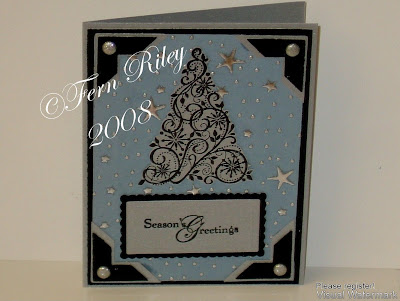
Holiday Blues - Season's Greetings


This is the card I made for Friday's Limited Supplies Challenge on SCS. Card must be 3/4th blue and only one non-paper embellishment. Which if you know me... is very hard to accomplish.. And I don't think I did accomplish it, but I had fun trying...
My base card is Brushed Silver,
Next layer is Doodlebug Crushed Velvet
Next is a layer of The Paper Company Beadwork - Starry Blue, which, by the way, came with all of that beautiful silver embossing on it... So I didn't cheat there....
Stamped the tree from Snow Swirled with VersaMark and embossed in black... Is EP considered the same as Glitter?? Cut the tree out.
Stamped sentiment from Snow Swirled and embossed it also. Cut with nestibilities and layered on Crushed Velvet. Punched the corners out with the SU Corner Punch and then added the Glitter Brads.. I had to use all 4 of them... 1 just didn't look right... Anyway, I like the way it turned out, I hope you do too...
Thanks for looking.
Pin It!

Saturday, December 20, 2008

Honey, I'm Wild About You - Happy Birthday!!


This is the card I made for the Sketch Challenge posted Wednesday on SCS.. Not much time for stamping, what with getting ready for Christmas and doing some babysitting the grandbabies... But my DHs Birthday is on New Years Eve and I really wanted to make a card for him while I had the time, and I thought this sketch challenge would work perfect. So this is what I did..
The base card is Chocolate Chip.
Next layer is BoBunny Xtreme Green Grunge DP
Added the ribbon and used some Decorative wire and made some faux barbed wire. Attached over the ribbon.
The picture is one I took this last summer right after he got this little Farmall running. He's kinda put her on hold for now because he has this HUGE Case in the shop totally split in half. But, you can be sure he will get back to this little gem before too long...
I layered the photo on Chocolate Chip and then popped up on pop dots. Punched corners out of the BoBunny DP and Chocolate Chip with the SU corner punch and layered, paper pierced and attached to photo. Stamped "Wild About You" with VersaMark and embossed with Black embossing powder. Added Square Brads, Circle Brads, Cord Bow and Charm...
I know he will love this card....
Thanks for looking...
Pin It!

Tuesday, December 16, 2008

Snowman


This is the card I made for today's Color Combination Challenge. Baja Breeze, Kiwi Kisses, Basic Gray and Not Quite Navy.
Base card is Baja Breeze
Next is a layer of Basic Gray stamped with Twill BG in Basic Black and then Stamped with Snowflake BG with VersaMark and then used Heat & Stick and then added dazzling diamonds. Cut the corners with decorative punch and then added Kiwi Kiss between these 2 layers.
Cut Baja Breeze and Not Quite Navy out with Nestibilities and then layered.. I stamped snowflakes from Snow Burst on the Not Quite Navy with VersaMark and then used heat & stick powder and then added dazzling diamonds on this, also. The Cute little snowman and bluebird are from Creative Imaginations, added ribbon, button and twine..
Thanks so much for looking..
Pin It!

Saturday, December 13, 2008

I "heart" U Card


This is the card I made for today's Inspiration Challenge, which was to get inspired with Block Party Press website. This is my inspiration piece http://flickr.com/photos/blockpartypress/2973510936/ This is what I did.
The base card is Basic Black and then I layered Going Gray, the next layer is Red Hearts DP. The top layer is Glossy White. I sponged Basic Black, Going Gray and Whisper White. The hearts are stamped with Best Wishes & More on the back side. This is sticky paper, so after I cut it out I peeled of the part that I stamped. The stem is cut from Always Artichoke. I added Scrap Metal Letters, Charm, Red Cord and stickles on the heart...
Thanks so much for looking.
Pin It!

Friday, December 12, 2008

My Recycled Old World Santa Card.


This is the card I made for today's challenge, which is to use something recycled on your card. After I read the description of the challenge this morning, I knew exactly what I was going to use. My dear, sweet friend gave me a Christmas Gift Bag with all of these beautiful stickers on the outside. Well, I was just as excited to get these as I was the gift inside. So I thought I would use some of the wonderful stickers she gave me.. And, I just love this Old World Santa Clause....
This is what I did..
The base card is Always Artichoke stamped with Twill BG Stamp in Always Artichoke.
Next is a layer of Creamy Caramel stamped with Twill BG Stamp in Chocolate Chip and then I stamped a Snowflake BG Stamp with VersaMark and then used Heat & Stick Powder and then added dazzling diamonds.
Framed this layer with Holiday Ribbon,
Added Jewels,
Then I popped Santa and the Holly stickers up with pop dots.
Actually this wasn't much of a challenge for me, because I'm always recycling ribbon, wrapping paper, buttons, earrings (jewelry), just about anything I can get in the envelope...lol
Thanks so much for looking...
Pin It!

Thursday, December 11, 2008

My Half Baked Thank You Card..


This is the card I made for today's Ways to Use It Challenge. Which was to use half of an image.
I decided to use half of a tree.
The base card is Sage Shadow
Next is a layer of More Mustard
Top layer is DP Bo Bunny's Beautiful Life Stripe.
I stamped my tree (Vintage Pine Tree from Stampabilities) right on the DP in Old Olive and Chocolate Chip.
Stamped my sentiment the same way. I cut the "Thanks" out and popped up it up with pop dots, added ribbon. Sponged around the edges with More Mustard and Sage Shadow. Added Brads..
Thanks so much for looking.
Fern
Pin It!

Wednesday, December 10, 2008

Winter Whisper Frost Card..


This is the card I made for today's Card Sketch Challenge on SCS.
My base card is Chocolate Chip
Next is a layer of Bo-Bunny Press DP (Winter Whisper Frost) I added dazzling diamonds to the snowflakes. The top layer is Baja Breeze run through the CB Snowflake EF and then layered over Chocolate Chip. Stamped the snowflake from Season of Joy with heat and stick powder and then added the blue glitter. Punched with the SU Circle and then layered on Chocolate Chip punched with the larger SU circle punch. Added satin ribbon, snowflake embellishment and brads...
Thanks so much for looking.
Fern
Pin It!

Tuesday, December 9, 2008

Spoiled Silly Fluffles


This is the card I made for today's Color Challenge. We were to use Taken with Teal, Riding Hood Red, Baja Breeze and Whisper White.

Base card is Taken with Teal
Next is a layer of Riding Hood Red DSP
Next is Taken with Teal which is stamped with Stampendous Marbled Frame and embossed with white ep.
Image is Penny Black Bubbly Fluffles, stamped with Craft Black ink on watercolor paper and colored with prisma colored pencils and Odorless Mineral Spirits. Layered on Baja Breeze and Riding Hood Red. Used stickles for bubbles. Added Flower Brad, Ribbon and Hardware..
I love these colors together....
Thanks so much for looking...
Fern
Pin It!

Monday, December 8, 2008

Snowflake Vellum Wine Glass Shade ON


I made this vellum shade for todays Try a New Technique. We were to make it out of vellum cs and then decorate it anyway we wanted to. I stamped snowflakes with versamark all over it and then used heat and stick powder and then sprinkled MS Sugar Coating - swimming pool glitter. Cut leaves out of glitter paper and then attached them along the top. Added the ric rac ribbon around the top and bottom and then added the bows with bells (which were earrings.) This one has a candle that's battery operated. These are very elegant looking and would make wonderful table decorations.
Thanks so much for looking..
Pin It!

Snowflake Vellum Wine Glass Shade OFF

Pin It!

Christmas Card - close up.


This is the Christmas Card I am sending out this year, I made 25 of these
The base card is Handsome Hunter. I stamped it with the Flannel BG stamp in Handsome Hunter ink. Then I sprayed lightly with silver glitter. Let dry overnight.
The image is stamped on white cs with basic black and then colored with SU Markers. Added stickles on the ribbon and berries. And added littly tiny gold beads for the center of the poinsettias. This is layered over burgandy mulberry paper. Added red jewels.
I used the poinsettia jumbo wheel on the envelope.
Thanks for looking...
Pin It!

My Christmas Cards for this year...

Pin It!

Friday, December 5, 2008

NOEL


This is the card I made for the Limited Supply Challenge at SCS. We could only use snowflake stamps, embellishment and paper... and it had to be glittery. AND use only one word on it...
So my base card is Real Red
Next is a layer of Silver Glitter Paper
Top layer is Glitter White CS run through the CB Snowflake EF.
The silver snowflake is cut from the silver glitter paper with the Cricut Christmas Noel cartridge and then I added a snowflake embellishment in center.
the NOEL is cut with the Cricut Christmas Noel Cartridge with the Silver and Red Glitter Paper. I added a Ribbon with another snowflake embellishment.

And my husband doesn't think I do anything on Fridays....lol

Thanks so much for looking...
Pin It!

Thursday, December 4, 2008

Letter to Santa


This is the card I made for SCS Ways to Use It Challenge for 12/4/2008. We were to use an envelope on our card, as our card, or with our card.. I decided to make one on my card. My grandkids are too little to do this now, but maybe next year we'll be doing this... I can't wait...

Base Card
Really Red
Next - Whisper White, run through the Snowflake CB EF
Next - Really Red, Cut with coluzzle and run through the Swiss Dots CB EF
Top Layer - DP from My Minds Eye - Cut with coluzzle.
The mailbox post is Karen Foster 2 x 4 DP
Mailbox is Bashful Blue and Brushed Silver and hand cut.
Flag- Really Red
Peel and stick letters
Envelope - DSP from SU (it was scrap, I don't know what the name is..)
Punch corners - Really Red and Whisper White, Swiss Dot CB EF
Added jewels.
Snowman - From Snow Globe, stamped in black on Whisper White, colored with SU markers and then highlighted with Iridescent Ice, cute out and popped up on pop dots.
Punched leaves out with the MS Leaf Punch. added Ribbon.
Thanks so much for looking...
Pin It!

MERRY CHRISTMAS TO ALL, AND TO ALL A GOOD NIGHT!


So far this is my DHs favorite card, and I really like it too.... I made this one for the Card Sketch Challenge, but I also used the speckled background technique on it. I used the blue inks for the backgound. Doesn't it remind you of National Lampoon's Christmas Vacation... We watch that movie every year and, I swear, it gets funnier everytime we watch it.

The base card Basic Black
Next - Brushed Silver

Panels
Base - Crushed Black Velvet

Top layer - Glossy White, brayered with Pacific Point, Blue Bayou. Stamped with the SU Sparkle BG with Heat and Stick Powder and then used Dazzling Diamonds.

Sentiment
Spotlight on Christmas, stamped with VersaMark on another piece of simple green bg and then embossed in black. Cut close to the edge but leave a tiny bit to the blue showing. Layered on a piece of Crushed Black Velvet punch with the SU Scallop Square and popped up on pop dots.

Santa and Sleigh
Cut with the Cricut Christmas Noel Cartridge in Basic Black.

Moon
Punch with the 1 3/4" SU Circle Punch out of Solid Glitter White

Thanks so much for looking....
Fern
Pin It!

Wednesday, December 3, 2008

Sympathy Cards


I made these two cards to take to the office... The challenge was to use Sahara Sand, Very Vanilla and Basic Black.
Base card - Very Vanilla
Next - I took a piece of Glossy White CS, masked a 1 3/8" circle and brayered with Basic Black, sprayed it with Simple Green Cleaner.
Stamped Lovely As a Tree with VersaMark and embossed in Black.
Stamped sentiment from Beautiful Borders with VersaMark and embossed in Black.
Stamped the dove from A Wish For Peace with VersaMark on Sahara Sand and embossed in White, Cut it out and popped it up with pop dot. Added decorative border.
Thanks so much for looking...
Pin It!

Simple Green Cleaner - Christmas Card.


For this card we were to use Simple Green household cleaner.
My base card is Bravo Burgandy
Next - Brushed Silver
Next - Is a piece of Glossy White CS that I brayered with Bravo Burgandy and spritzed with Simple Green Cleaner. I patted it with a paper towel to get this effect.
Top layer is stamped with Encore Ink on Bravo Burgandy and heat set. Cut with nestibilities and then Cut a piece of Brushed Silver with Nestibilities and then layered. Doodled around the edges with white gel pen.
The sentiment is stamped directly on the Glossy White CS with encore silver and then shadowed with Bravo Burgandy. I tried to heat set it, but it still smeared a little.
Added a bow with snowflake and then took 2 hat pins, I cut the ends off of both added 2 beads and then put them together with a little glue. Just for a different look.
Thanks so much for looking...
Fern
Pin It!
Related Posts Plugin for WordPress, Blogger...